Please post an article on operation breakdown and machine layout of a standard bra. I was unable to find anything on the Internet. ... asked by Isuru.
The following operation breakdown of a bra refers to a particular style. Note that, SAM values of the operations may vary according to the style, seam length, attachment and work aids used and machine type.
Prior to use below mentioned SAMs and operation sequence, discuss it with your engineers. I have attached the machine layout of bra making in an assembly line. To improve machine utilization few operations are clubbed together.
Operation Breakdown: Bra
| OP # | SEWING PROCESS | SAM | MACHINE |
| 1 | Join Cups | 0.57 | SNLS |
| 2 | Attach Tape to Cups | 0.73 | DNLS |
| 3 | attach Elastic to side cups | 0.44 | 3SZZ |
| 4 | Set support Panels | 0.39 | SNLS |
| 5 | Serge support panels | 0.62 | 3TOL |
| 6 | Join support panels, cup and front | 1.52 | SNLS |
| 7 | Attach coverstitch tape to front | 0.61 | DNLS |
| 8 | Join backs to cups | 0.55 | SNLS |
| 9 | Attach coverstitch tape to sides | 0.47 | DNLS |
| 10 | Attach lace and tape to cups | 0.76 | DNLS |
| 11 | Attach elastic to band | 0.90 | ZZ |
| 12 | Attach upper elastic & straps | 0.91 | 3SZZ |
| 13 | Cover support panels edges | 0.54 | 3TOL |
| 14 | Attach hooks and eyes to straps | 1.39 | SNLS |
| 15 | Set eye to back | 0.36 | ZZ |
| 16 | Set hook to back | 0.50 | SNLS |
| 17 | Attach trimming to front | 0.25 | SNLS |
| 18 | Trim thread and inspect | 1.00 | MAN |
| Total SAM | 12.51 |
Full name of the sewing machine
SNLS: Single Needle Lock Stitch machine
DNLS: Double Needle Lock stitch machine
3TOL: 3 thread overlock / overedge sewing machine
ZZ: Zig-zag sewing machine (3S for 3 stitches)
MAN: Manual work
Machine Layout for Bra making
In the machine layout figure, operation sequence numbers and machine name have been mentioned.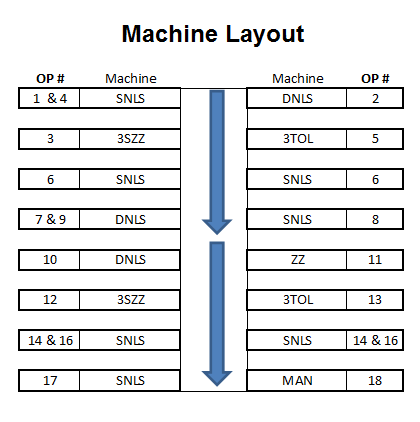 |
| Line layout |
Source: Flexible manufacturing system by Hugo L. Rubinfeld
Related Articles:
- Operation Breakdown and SAM of the Full Sleeve Formal Men’s Shirt
- Operation breakdown and SMV of a Trouser
- Operation Breakdown and SMV of a Jeans
- Process flow chart of a Tee-Shirt